So far we have just used a simple colored material for our mesh. If we want to create something more realistic we’ll have to start using a technique called texture mapping.
Put very simply, this means taking a square image and stretching it over the surface of a 3D object.
Of course, this will be very easy to do if the surface of the 3D object is square, and less easy of the surface is curved. Fortunately, the cube that we’ve been using so far will be very easy to apply textures to since every surface is flat.
See the code from the previous chapter Geometries and meshes, and we’ll continue from there.
Mapping a 2D Texture onto a 3D Object Using a UV Map
How do we go about stretching a 2D texture over the surface of a 3D shape?
The answer to that is a technique called UV Mapping.
Let’s take a quick look at how that works now, and then try it out on our spinning cube.
UV Mapping Explained
Our cube geometry looks something like this (see Figure 1), where each of the red dots is a vertex and has a position in 3D space defined by (x, y, z) coordinates.
Figure 1: Cube geometry.
We want to take a 2D square texture and map it onto our 3D geometry.
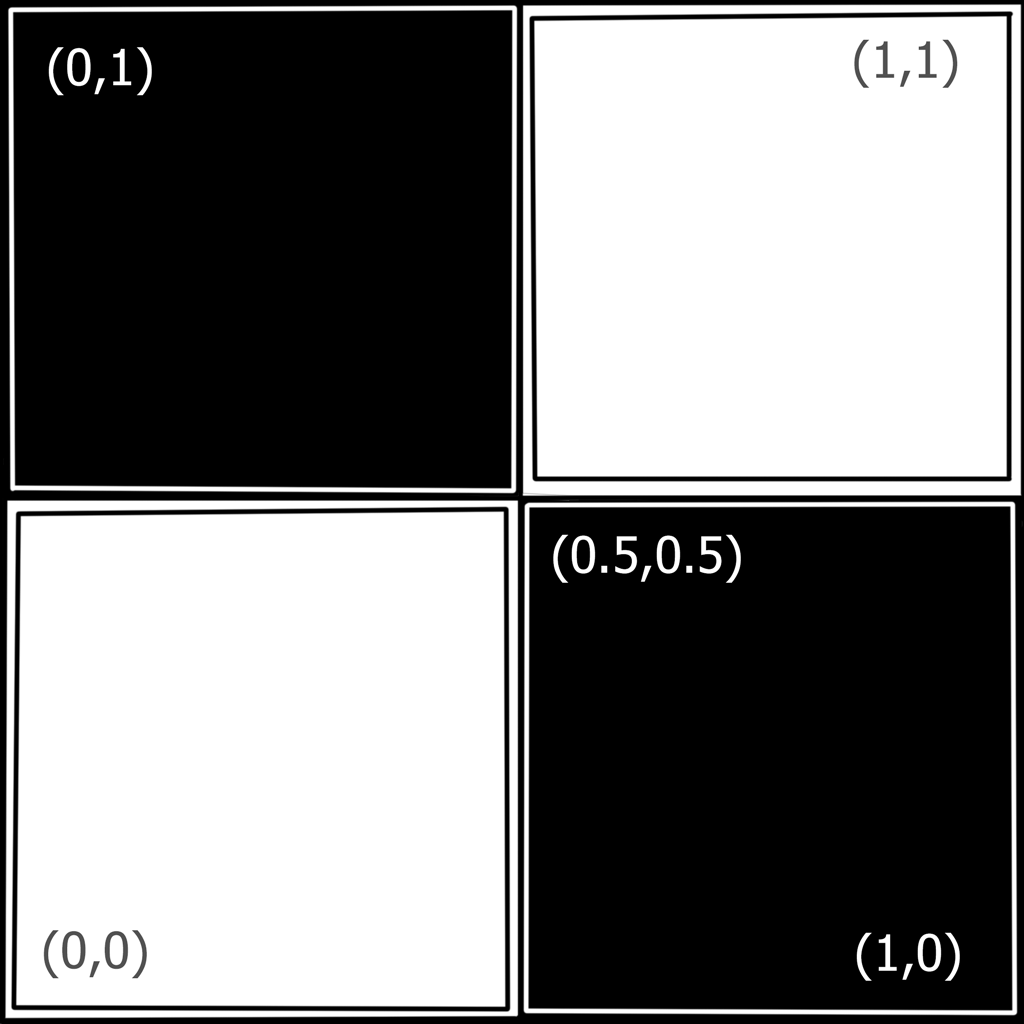
To do so we’ll imagine a 2D coordinate system on top of the texture, with (0, 0) in the bottom left and (1, 1) in the top right. Since we’ve already used the letters x, y and z for our 3D (x, y, z) coordinates, we’ll call these 2D textures coordinates by the letters (u, v), which is where the name UV mapping comes from.
Let’s create a texture now to help us visualize this. We’ll use a simple black and white checker pattern and label a few of the UV coordinates. Once we are done, we’ll have something that looks like this:
Figure 2: UV grid texture.
UV mapping is the process by which we map 2D (u, v) coordinates onto 3D (x, y, z) coordinates:
(u, v) → (x, y, z)
In the figure below, we’re showing how we want the texture to map onto the front face of the cube.
Figure 3: 3D coordinated mapped to UV coordinates.
We’ve also drawn in the (x, y, z) coordinates of the vertices of this face, so we can see that we want this mapping from UV coordinates to 3D coordinates:
(0, 0)
→
(−1, −1, 1)
(0, 1)
→
(−1, 1, 1)
(1, 1)
→
(1, 1, 1)
(1, 0)
→
(1, −1, 1)
It’s a very simple mapping for now since we are just mapping a square texture onto the square face of our cube, and we can use similar mappings for the other five faces.
Introduction Threejs Texture
Textures are generally images that are most often created in some 3rd party program like Photoshop or GIMP. For example let's put this image on cube.
We'll modify one of our first samples. All we need to do is create a TextureLoader. Call its load method with the URL of an image and and set the material's map property to the result instead of setting its color.
                          var loader
                          =
                          new
                          THREE.TextureLoader();


                          var material
                          =
                          new
                          THREE.MeshNormalMaterial
                          ({ map: loader.load('resources/images/uv_map.png') });
Demo
Project download texture.zip


